Turn off water, disconnect lines, remove old faucet, install and test.
If you want to master how to replace kitchen faucet without stress, you are in the right place. I have installed and replaced dozens across homes and rentals. Here, I share a clear method, pro-level tips, and simple checks. This guide breaks down how to replace kitchen faucet step by step, so you can finish in one afternoon with clean results.
Tools and materials you’ll need
- Adjustable wrench or basin wrench for tight spaces
- Phillips and flathead screwdrivers
- Bucket, rags, and a shallow pan for drips
- Plumber’s tape (PTFE) for threaded joints
- Plumber’s putty or silicone, as required by the faucet maker
- New supply lines if your faucet does not include them
- Flashlight or headlamp for the cabinet
- Utility knife and cleaning pads for old sealant
- Tape measure for hole spacing
- Towels or a foam pad to protect your back and the cabinet edge
Choosing the right faucet matters. Confirm the hole count in your sink. Check reach, spout height, and whether you need a deck plate. If you are still learning how to replace kitchen faucet, match parts first to avoid mid-job runs to the store.
Safety and prep checklist
- Turn off the hot and cold shutoff valves under the sink. Turn the handles clockwise.
- Open the faucet to relieve pressure. Keep it open while you disconnect lines.
- Place a bucket and rags under the valves and faucet. Expect some water.
- Unplug any garbage disposal. Use a GFCI outlet test if unsure.
- Clear the cabinet. Give yourself space to move and see.
- Take a photo of the old setup. It helps during reassembly.
- Check supply lines for age. Replace braided lines older than five years.
- Read the faucet manual. It often shows exact gaskets and torque.
This prep step saves time. It is the best start for anyone studying how to replace kitchen faucet with confidence.

Step-by-step: how to replace kitchen faucet
- Confirm the hole layout. Most sinks have one to four holes. Measure center-to-center spacing if using a deck plate.
- Shut off water. Test the faucet to confirm flow stops fully.
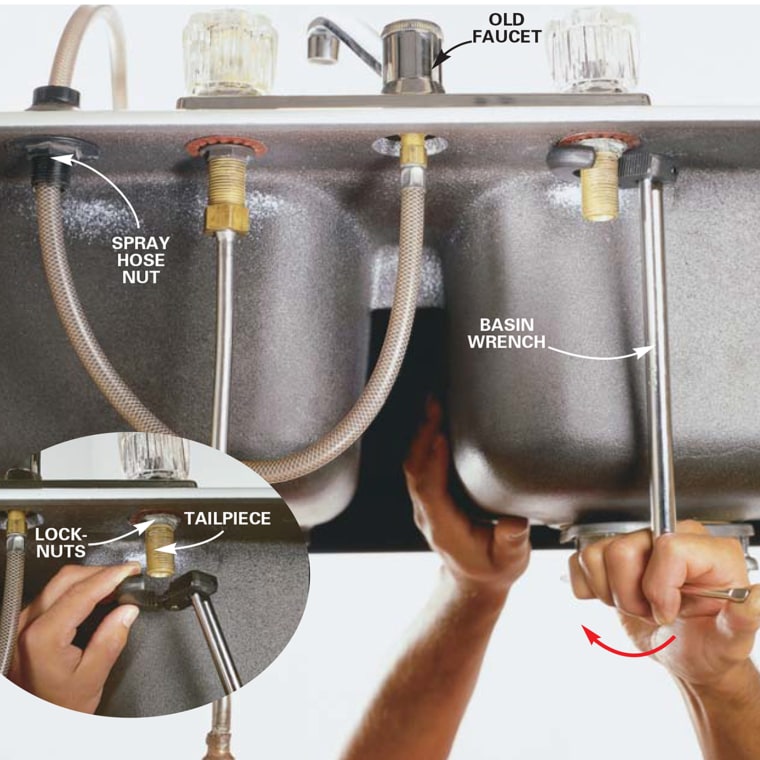
- Disconnect supply lines at the shutoff valves. Use a wrench and steady counter pressure. Catch water in a pan.
- Disconnect lines at the faucet base if needed. Some units have quick-connect clips. Press and hold to release.
- Remove mounting nuts under the sink. A basin wrench helps in tight spots. Support the faucet from above as you loosen.
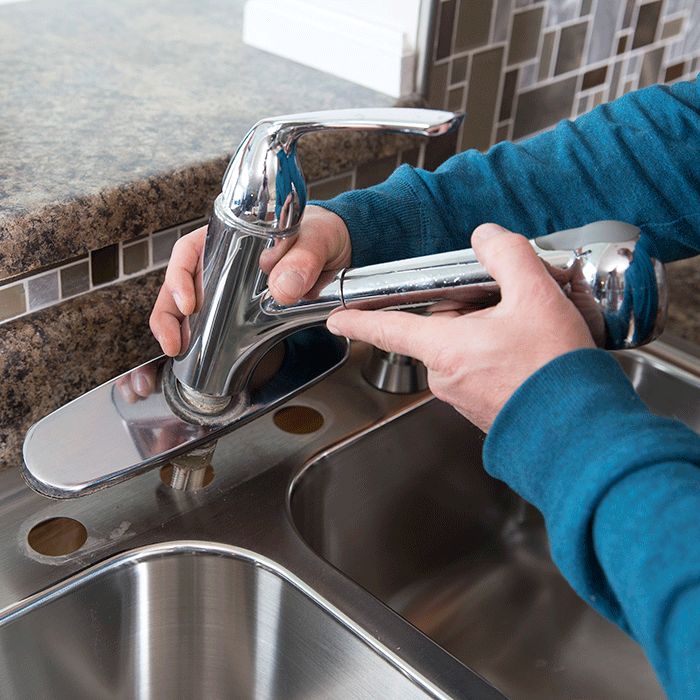
- Lift out the old faucet. Scrape old putty or silicone from the deck. Clean with a mild cleaner. Rinse and dry.
- Dry-fit the new faucet. Place the gasket or use putty if the maker calls for it. Many modern gaskets do not need putty.
- Feed hoses and shank through the sink hole. Center the base or deck plate before tightening.
- Install mounting hardware. Hand-tighten first. Then snug with a wrench. Do not over-tighten. You can crack a sink or warp the base.
- Connect supply lines. Hot is on the left, cold on the right. Add plumber’s tape to male threads if the manual asks for it.
- If you have a pull-down sprayer, attach the quick-connect and install the weight. The weight should hang free and not hit plumbing.
- Turn on shutoff valves slowly. Check every joint for leaks. Run water for 60 seconds to purge air and debris. Check again after 10 minutes.
Personal tip from the field: When teaching beginners how to replace kitchen faucet, I always say to lay a towel over the cabinet edge. Your ribs will thank you, and you will work longer without rushing.

Special cases and configurations
- Single-hole sinks with deck plates. Use the plate to cover extra holes. Seal the plate per the manual to prevent water wicking.
- Three-hole sinks without a plate. Choose a faucet with matching escutcheon or separate handles and spout.
- Touch or touchless models. Follow the wiring diagram. Mount the control box high enough to avoid standing water and keep the battery pack dry.
- Sprayer side holes. If your new faucet includes a pull-down spout, cap the side sprayer hole with a soap dispenser or a matching plug.
- Thick countertops. You might need a longer shank kit. Check the spec sheet for max deck thickness.
- Old galvanized or stuck nuts. Use penetrating oil and wait 10 minutes. A basin wrench or oscillating tool saves time in tight corners.
These details matter when learning how to replace kitchen faucet in older kitchens. Planning prevents surprises once you are under the sink.

Common mistakes and how to avoid them
- Over-tightening mounting nuts. This can warp the base and cause leaks. Snug, then quarter-turn.
- Skipping the gasket. Always use the correct gasket or sealant the maker lists.
- Crossing hot and cold lines. Label or keep the lines apart on the floor as you work.
- Forgetting the sprayer weight. The sprayer will not retract well. Place the weight at the mark shown in the manual.
- Not flushing lines. Debris can clog aerators. Remove the aerator and flush for one minute.
- Reusing brittle supply lines. Old lines fail under pressure. Replace them while the space is open.
When I coach friends on how to replace kitchen faucet, these fixes prevent 90% of callbacks.

Troubleshooting leaks and low flow after installation
- Drip at the base. Loosen, re-center the faucet, reset the gasket, and re-tighten evenly.
- Leak at supply connections. Re-seat the washer, add fresh tape if required, and avoid over-tightening.
- Low flow. Remove the aerator and flush. Check for debris caught in the check valve or quick-connect.
- Sprayer does not retract. Move the weight lower and clear obstructions in the cabinet.
- Handle feels stiff. Confirm the retaining nut is not too tight. Lubricate O-rings with silicone grease if the manual allows.
These quick checks are part of any solid plan for how to replace kitchen faucet with a clean finish.
Cost, time, and skill: what to expect
- Time needed. Simple swaps take 60 to 90 minutes. First-timers may want two hours.
- Cost of faucet. Quality kitchen faucets range from around $80 to $400, with pro features higher.
- Added parts. Expect $10 to $30 for supply lines and sealants if not included.
- Pro labor. Typical rates range widely by region. Budget for a service call if valves fail.
If you follow this guide on how to replace kitchen faucet, you can save on labor and still get pro results.

Maintenance tips to make your new faucet last
- Wipe the deck dry after use. Water spots lead to mineral build-up.
- Clean with mild soap and a soft cloth. Avoid harsh pads and strong chemicals.
- Remove and soak the aerator every few months. Vinegar helps dissolve deposits.
- Inspect supply lines yearly. Replace at the first sign of fray or rust at fittings.
- Exercise shutoff valves twice a year. Turning them keeps them from freezing up.
Simple habits keep performance high long after you learn how to replace kitchen faucet.

Eco and code considerations
- Flow rate. Many regions require 1.8 gpm or less for kitchen faucets. Check the label.
- Lead-free rules. Modern faucets meet strict limits. Avoid very old stock or unlisted imports.
- Backflow. Use the included check valves and correct sprayer routing to avoid crossflow.
- Flexible supply lines. Stainless braided lines are standard and reliable when installed well.
- Disposal and dishwasher ties. Support hoses with gentle loops. Do not kink or strain them.
These points support health and safety, and they round out best practice for how to replace kitchen faucet in any home.
Frequently Asked Questions of how to replace kitchen faucet
How long does it take to learn how to replace kitchen faucet?
Most people can do it in one to two hours. Careful prep and the right tools make it faster.
Do I need plumber’s putty when I learn how to replace kitchen faucet?
Only if the manufacturer calls for it. Many faucets include a gasket that seals without putty.
What if my shutoff valves will not close when starting how to replace kitchen faucet?
Do not force them. Close the house main, then replace the valves or call a pro.
Can I reuse old supply lines when I practice how to replace kitchen faucet?
It is not wise. New braided lines are cheap and far safer.
Why is my new faucet noisy after I follow how to replace kitchen faucet steps?
Air is in the lines. Run the water for a minute with the aerator removed to clear it.
Conclusion
Replacing a kitchen faucet is a clean, simple project when you plan well. You shut off water, remove the old unit, install the new one, and test. With the steps and tips here, you know how to replace kitchen faucet the right way, and you can fix small issues fast.
Ready to get started? Gather tools, check your sink layout, and follow the steps. If this guide helped, share it, subscribe for more home fixes, or leave a question so I can help with your next project.