Turn off water, remove the old faucet, mount the new, connect, test.
If you want a clean, leak-free upgrade, you are in the right place. I will show you how to install a kitchen faucet the right way. This guide blends expert steps with real job-site tips. You will learn what to buy, what to avoid, and how to finish strong. Follow along to save time, prevent leaks, and get a pro result.

What you need to install a kitchen faucet
Gather tools and parts before you start. This keeps the job smooth and safe.
Tools:
- Adjustable wrench for nuts and valves.
- Basin wrench for tight spots behind the sink.
- Pliers for quick-connect fittings.
- Screwdriver for mounting plates and clips.
- Utility knife or putty knife to remove old sealant.
- Flashlight or headlamp to see under the sink.
- Bucket and towels to catch water.
- Tape measure to confirm hose reach and deck thickness.
Supplies:
- New faucet with gasket or base plate.
- Braided supply lines if not included.
- Plumber’s putty or 100% silicone per maker’s guide.
- Teflon tape for male pipe threads only.
- Optional: shutoff valves if old or leaking.
- Optional: escutcheon if you need to cover extra holes.
Pro tip from the field: I never reuse old supply lines. They fail at the worst time. Fresh lines cost little but prevent big problems.
This kit will support you as you learn how to install a kitchen faucet with fewer trips to the store.
Preparation and shutoff
Smart prep makes the job easy and clean. It also protects your cabinets and flooring.
- Clear the space under the sink. Give yourself room to move.
- Set a towel and bucket under the valves.
- Turn off the hot and cold shutoff valves. Turn clockwise.
- Open the faucet to release pressure.
- If valves do not close, shut off the main water line.
- Unplug the garbage disposal. Safety first.
- Take a quick photo of existing connections for reference.
If you are new to how to install a kitchen faucet, this small prep step saves you time and stress later.

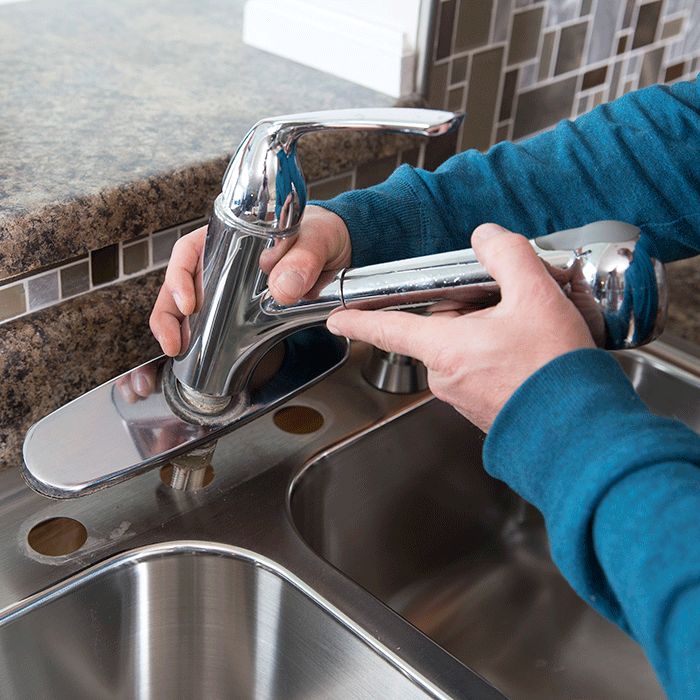
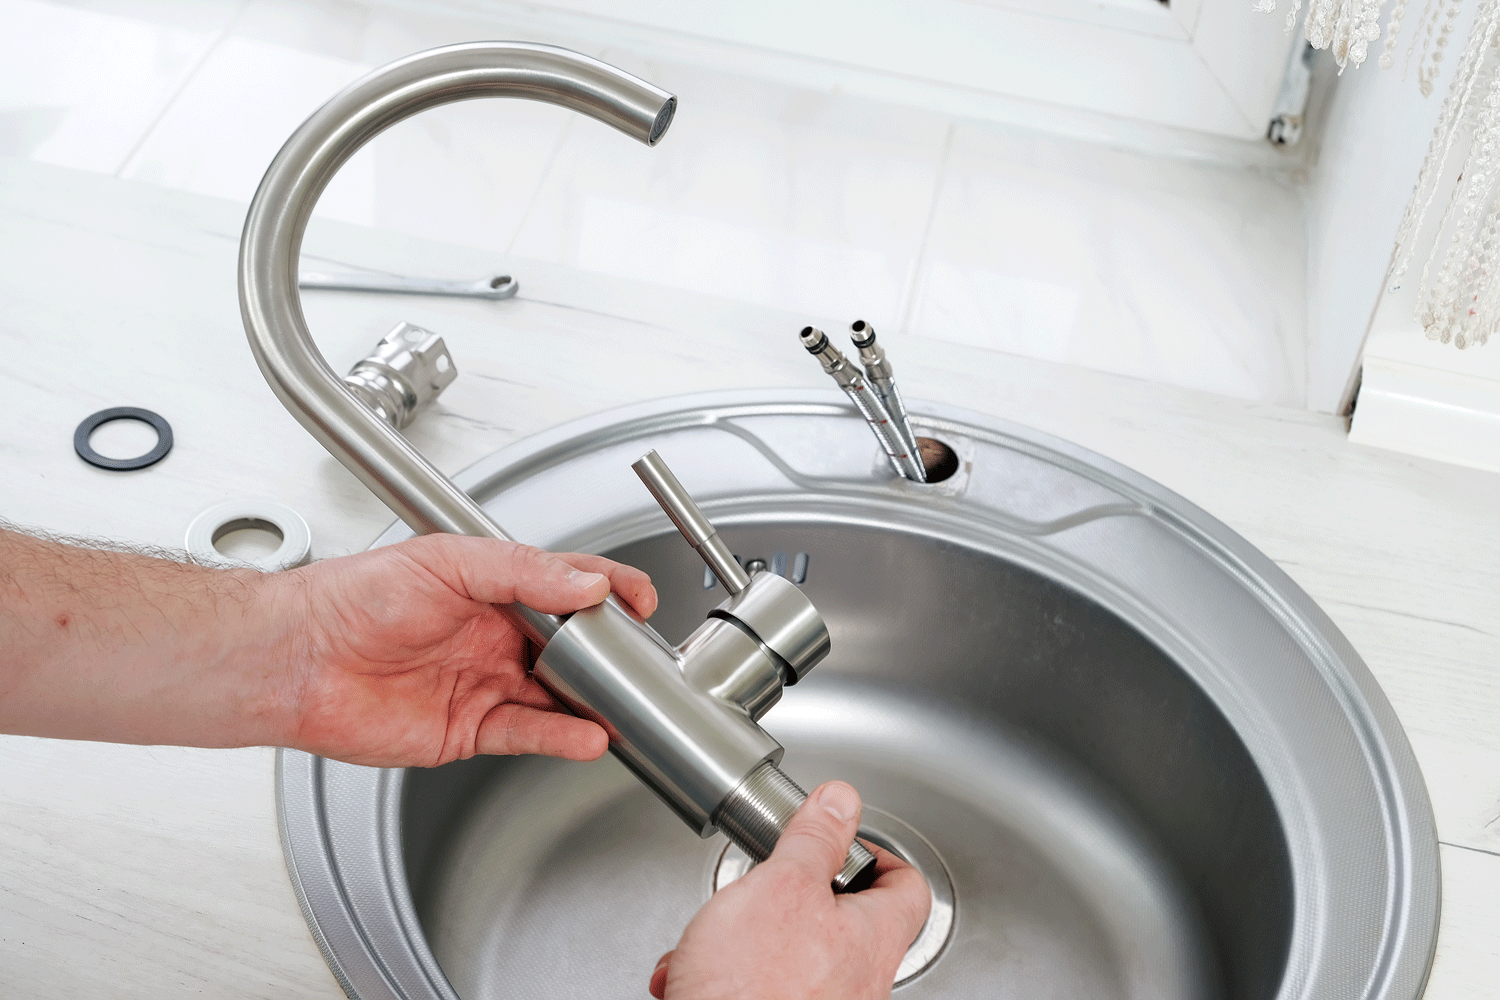
How to remove the old faucet
The old faucet is often the hardest part. Take it slow and use the right tool.
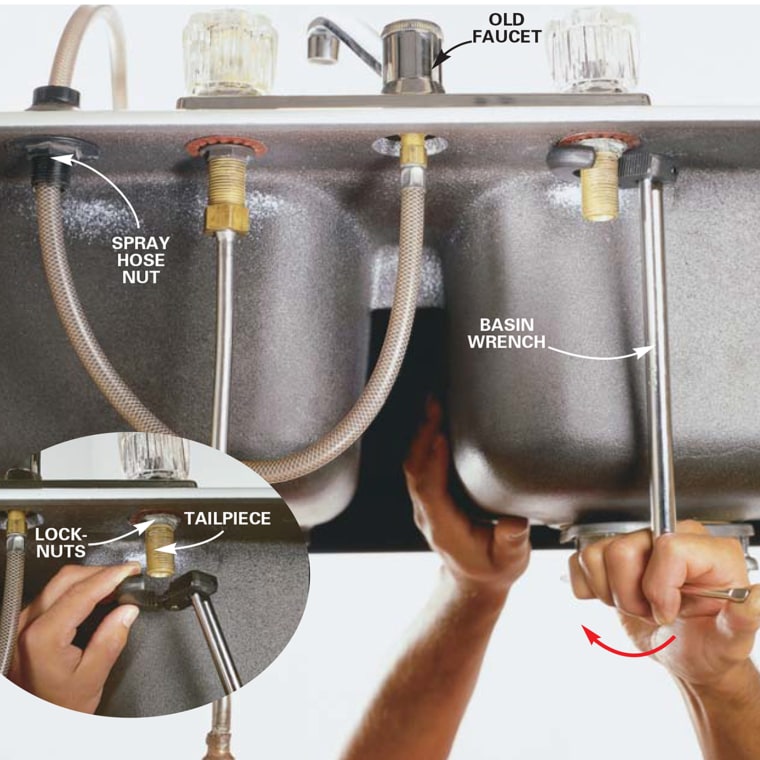
- Disconnect the supply lines from the shutoff valves.
- If you have a pull-down sprayer, remove the hose weight.
- Release the quick-connect on the spray hose. Push and pull as marked.
- Use a basin wrench to loosen the mounting nuts under the sink.
- Support the faucet from above as you free the last nut.
- Lift the faucet out. Wiggle if needed to break the seal.
- Scrape off old putty or silicone. Clean the deck with mild cleaner.
If parts are rusted, apply penetrating oil and wait a few minutes. This is common when learning how to install a kitchen faucet in older homes.
How to install the new faucet
Read the maker’s guide first. It shows gaskets, clips, and the right sealant method.
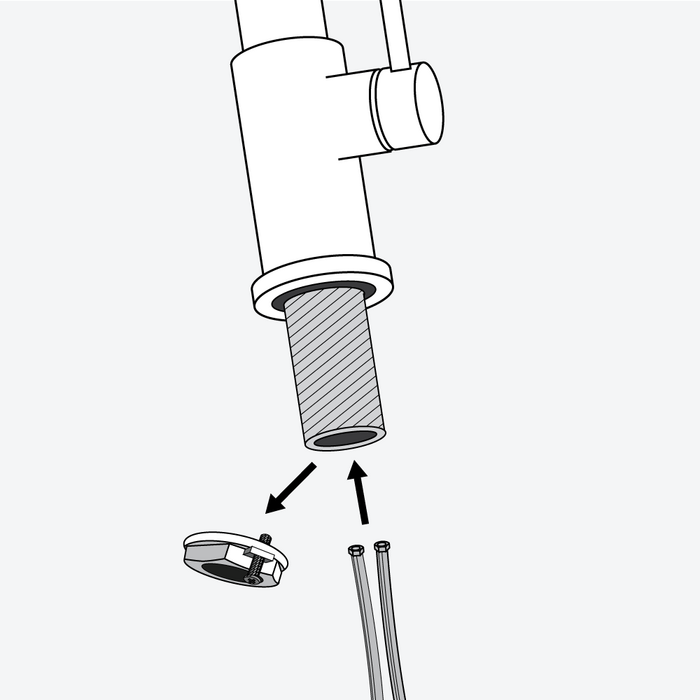
Step 1: Dry fit and seal
- Place the gasket on the deck. Use the escutcheon if needed.
- If the maker says putty, roll a thin rope and place it around the base.
- Set the faucet and feed hoses through the hole.
Expert tip: Do not use plumber’s putty on porous stone. Use 100% silicone instead. I have seen oil stains in granite from the wrong sealant.
Step 2: Align and mount
- Center the faucet spout where you want it.
- From below, add the washer and nut in the right order.
- Hand-tighten first. Then snug with a basin wrench.
- Do not over-tighten. You can bend the deck.
Step 3: Attach sprayer hose
- Snap the spray hose onto the outlet. Listen for a click.
- Add the counterweight on the marked zone of the hose.
- Test pull and retraction by hand.
These steps cover the heart of how to install a kitchen faucet with a pull-down sprayer. The same basics apply to pull-out and bridge styles.

Connect water lines and test for leaks
This is where many leaks start. Slow and steady wins here.
- Connect hot to the left valve and cold to the right valve.
- Most faucet lines are 3/8 inch compression. Hand-tighten, then add a quarter turn.
- Use Teflon tape only on male pipe threads, not on compression threads.
- Keep lines untwisted. Avoid sharp bends.
- Remove the aerator. This prevents debris from clogging it.
- Turn on the shutoff valves slowly. Check for drips.
- Run the faucet on cold, then hot, for 2 minutes to flush.
- Dry all joints. Wait 10 minutes and check again for moisture.
If a joint weeps, tighten a little more. If it still leaks, remove and reset the fitting. When you know how to install a kitchen faucet, you learn that most leaks are from cross-threading or over-tightening.

Optional add-ons: side sprayer, filter, or soap dispenser
Many sinks have extra holes. Use them well for function and style.
- Side sprayer: Install the head and hose through the hole. Connect to the diverter port. Check for clear hose travel.
- Soap dispenser: Mount the pump and tighten from below. Fill from above using a small funnel.
- Water filter or instant hot: Follow the maker’s flow path. Add a hole if your sink allows or use an existing one.
Add-ons can lift the value of how to install a kitchen faucet by making your everyday work faster and cleaner.

Troubleshooting and fixes
Even pros run into surprises. Here is how to solve the most common ones.
- Slow leak at base: The base is not sealed or nuts are loose. Reseat the gasket, then tighten.
- Drip at shutoff valve: The valve is old or packing is worn. Replace the valve before you finish.
- Low flow: Debris in aerator or supply. Remove the aerator and flush again.
- Hose will not retract: Weight is in the wrong spot or hits pipes. Move the weight and clear the path.
- Faucet wobbles: Countertop is too thick or washer is wrong side up. Use an extension kit or flip the washer.
When you show others how to install a kitchen faucet, remind them to test again the next day. Wood cabinets can hide small leaks. Paper towels under joints make checks easy.
Pro tips, maintenance, and when to call a pro
These quick wins raise the quality of your work and extend faucet life.
- Replace old shutoff valves while you are there. Angle stops are cheap.
- Use new braided lines every time. They are safer and cleaner.
- Keep the pull-down hose path clear. Avoid tie wraps in the way.
- Clean with mild soap only. Harsh cleaners kill finishes fast.
- Budget your time. Most jobs take 45 to 90 minutes.
Call a licensed plumber if:
- The shutoff valves will not close.
- You see corroded or kinked copper lines.
- The sink is cracked or the countertop is too thick for standard mounts.
Knowing when to stop is part of how to install a kitchen faucet like a pro. You will save money and avoid damage.
Frequently Asked Questions of how to install a kitchen faucet
How long does it take to install a kitchen faucet?
Most DIY installs take 45 to 90 minutes. Removal of an old, corroded faucet can add extra time.
Do I need plumber’s putty or silicone?
Follow the maker’s guide. Use silicone on stone or where putty could stain.
Can I use the old supply lines?
It is not wise. Fresh braided lines reduce leak risk and cost very little.
Why is my new faucet water flow low?
Debris often clogs the aerator during install. Remove the aerator and flush the lines.
What size are typical faucet connections?
Most modern faucets use 3/8 inch compression connectors. Always check your model before buying lines.
Do I need Teflon tape on compression fittings?
No. Use Teflon tape only on male pipe threads, not on compression fittings.
Conclusion
You now know how to install a kitchen faucet from start to finish. You learned the tools, the steps, and the checks that prevent leaks. You also saw fixes for the most common issues.
Set aside an hour, follow each step, and take your time. You will get a clean, solid install and a kitchen that works better right away. Try the guide today, and share your results or questions in the comments.