Start crisp, safe, and simple: your first week with an air fryer.
You bought an air fryer to save time and eat better, but the first few tries can feel like guesswork. Do you preheat? How much oil is too much? Why do fries look pale, or chicken get dry? I have coached many first-time users, and I know the small tweaks that fix big problems. This air fryer cooking guide for beginners shows you how to set up, season, and cook smart from day one. You will learn the right temperatures, the right oils, the best accessories, and the timing tricks that lock in crunch without burning dinner.
Air Fryer Cheat Sheet Magnets & Guide Booklet
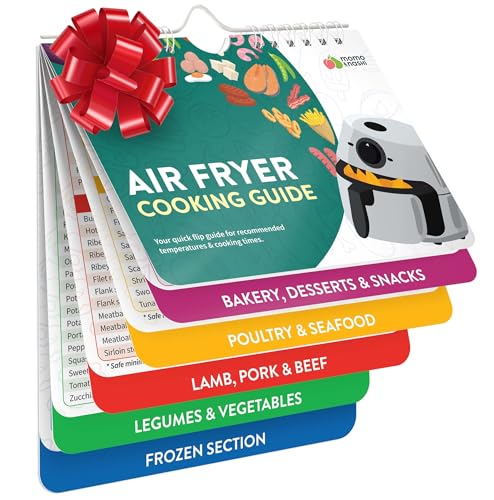
This handy set blends quick-glance magnet charts with a compact booklet, which is ideal when you are learning a new appliance. The magnets sit on your fridge or the side of a steel air fryer, so you can see times and temps while you cook. The booklet adds tips, sample recipes, and a clear overview of accessories like liners and racks. If you want a clean, simple, and visual air fryer cooking guide for beginners, this bundle works right away.
I like how the charts group foods by protein, veggie, frozen snacks, and baked goods. That format saves you from flipping through a long cookbook while food waits. The liner guidance helps you use parchment or silicone without blocking air flow. The result is faster prep, fewer mistakes, and better texture. It also makes a nice gift for a new homeowner or student who needs a quick start.
Pros:
- Clear, large-print magnets for fast time and temperature checks
- Booklet expands on basics with tips, racks, and liner use
- Organized by category for easy look-up during cooking
- Great for visual learners and busy weeknights
- Reduces trial and error for crunchy, even results
- Good pairing with any standard basket or oven-style unit
- Solid starter gift for anyone new to air frying
Cons:
- Magnet adhesion varies on some non-magnetic stainless finishes
- General times may need small tweaks for your specific model
- Advanced users may want deeper recipe variety
My Recommendation
If you want a simple and fast reference, this set is a winner. It fits how most people actually cook: quick glance, adjust, and go. I recommend it if you just bought your first unit, or if you gave an air fryer as a gift and want to include a guide that prevents early mistakes. It works especially well as an air fryer cooking guide for beginners because it gives confidence on day one.
The top benefit is reduced guesswork. The next is better texture. You will also love that it encourages safe liner use, which protects baskets while keeping air flow open. The value is strong, and it is easy to find online any time you need it.
| Best for | Why |
|---|---|
| New users who want fast results | Clear charts shorten the learning curve for timing and temps |
| Small kitchens and dorms | Magnets save counter space and speed up meal prep |
| Gifting with a new air fryer | Instant, friendly air fryer cooking guide for beginners |
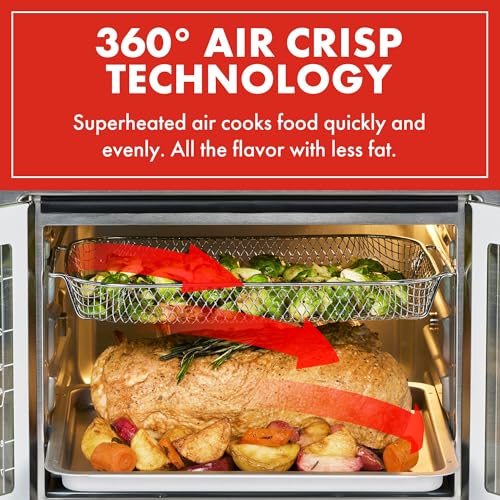
How an Air Fryer Works (Simple Science for New Cooks)
An air fryer is a compact convection oven. A strong fan pushes hot air around your food. That air browns the surface fast. You get a crisp bite with a small amount of oil.
Think of it like wind around a campfire. The wind makes heat touch every side. This movement dries the outside to a golden crust. Inside, moisture stays if you set the right time and temperature.
Modern models use 1200–1800 watts. They preheat fast, often in 2–5 minutes. The fan, basket design, and distance to the heater all affect cook time and browning.
The First 10 Steps: Air Fryer Cooking Guide for Beginners
Starting well sets the tone for every meal. Here is a short path that works. I use this plan when I teach new owners in person. It reduces waste and boosts confidence.
- Do a burn-off. Run empty at 400°F for 5–10 minutes. This clears light factory residue.
- Wash and dry the basket and tray. Use warm water and mild soap before the first cook.
- Preheat for most foods. Two to five minutes creates even browning.
- Use 1–2 teaspoons of oil per pound for crisp texture. Toss to coat.
- Space food in a single layer. Air needs room to move.
- Shake or flip halfway. This is key for fries and bites.
- Start low on time. Add 1–2 minutes as needed.
- Use a thermometer for meat. Aim for safe internal temps.
- Rest meat 3–5 minutes. Juices settle and texture improves.
- Clean after each use. Keep the nonstick in good shape.
Starter Temperatures and Times You Can Trust
Use these as a baseline. Models vary, so watch the first batch. Then adjust in small steps. This is my reliable air fryer cooking guide for beginners when you want simple wins.
- Frozen fries: 380°F, 12–16 minutes. Shake at 6–8 minutes.
- Chicken thighs (boneless): 380°F, 14–18 minutes. Internal 165°F.
- Chicken wings: 400°F, 18–22 minutes. Flip at 10 minutes.
- Salmon fillet: 390°F, 8–12 minutes. Internal 125–135°F for medium.
- Shrimp (peeled): 370°F, 6–8 minutes. Pink and firm.
- Brussels sprouts (halved): 375°F, 14–18 minutes. Toss with 1 tsp oil.
- Broccoli florets: 375°F, 8–10 minutes. Light char is good.
- Baked potato (medium): 390°F, 35–45 minutes. Pierce and oil skin.
- Garlic bread: 350°F, 4–6 minutes. Watch for quick browning.
- Reheat pizza: 350°F, 3–5 minutes. Crisp without drying.
Use a food thermometer to confirm doneness for meat and fish. Chicken should hit 165°F. Ground beef should reach 160°F. Pork is safe at 145°F with a short rest.
Basket vs. Oven-Style Air Fryers
Basket models are compact. They are fast and easy to shake. They cook small batches very well. They fit small kitchens and quick snacks.
Oven-style models look like mini ovens. They offer more space. They can fit racks, a rotisserie, or a small pizza. They are great for families who need more room.
If space is tight, pick a 4–6 quart basket model. If you cook for four or more, an 8–12 quart oven-style unit saves time. The air fryer cooking guide for beginners works in both types with minor tweaks.
Oil, Seasoning, and Breading 101
Air fryers need less oil than deep frying. You still need some oil for a crisp bite. Use avocado, canola, or light olive oil. They resist smoke at higher heat.
Do not soak food. Aim for a thin coat. A spray bottle or mister helps. Season before cooking for deeper flavor.
For breaded items, do a dry-wet-dry method. Flour, then egg, then crumbs. Press crumbs to stick. Chill 10 minutes, then air fry. You will get a better crust that stays put.
Common Beginner Mistakes and Easy Fixes
Overloading the basket is the top issue. Food steams instead of browning. Fix this by cooking in batches or using a rack in oven-style units.
Skipping the flip is another miss. Air hits the top harder than the bottom. Flip or shake at the halfway mark for even color.
Using too much oil can cause soggy spots. Start light and add only if needed. If food is pale, raise heat by 10–15°F for the last few minutes.
Cleaning and Care That Protects Your Air Fryer
Let the unit cool. Remove the basket and tray. Wash with warm water and mild soap. A soft sponge is best for nonstick.
Wipe the heating area with a damp cloth. Do not spray cleaner into the fan. Dry all parts fully. Then reassemble.
Use parchment liners only when food is on top. Loose paper can lift into the fan. Silicone liners are reusable and safe when sized right. This is a good tip in any air fryer cooking guide for beginners.
Safety and Food Temperatures Made Simple
Cook chicken to 165°F. Ground beef to 160°F. Pork and fish are done at 145°F. These targets help avoid illness and keep texture ideal.
Leftovers should reheat to 165°F. Use a thermometer, not guesswork. Keep raw and cooked foods apart. Wash hands after handling raw meat.
Never put water in the basket to cool it. Heat plus water can damage parts. Let it cool on its own or set it to a low temp to dry.
Accessory Guide: What You Need and What You Don’t
Not every add-on helps. Some are vital. Some are fluff. An air fryer cooking guide for beginners should sort them out.
- Silicone liners: Protect nonstick and ease clean-up. Choose vented designs for airflow.
- Parchment liners: Good for sticky foods. Only use with food weight on top.
- Racks and skewers: Double your cooking area in oven-style units. Great for wings.
- Meat thermometer: The most important tool for safe, juicy meat.
- Silicone cups: Perfect for egg bites, muffins, and lava cakes.
- Oil mister: Helps apply a thin, even coat for crisp texture.
Skip bulky pan sets that block air. Avoid accessories that scratch nonstick. Check size before you buy anything. A snug fit is key.
Simple 7-Day Starter Plan
This plan reduces stress. It helps you practice core skills. You will learn timing, flipping, and seasoning. It is a friendly air fryer cooking guide for beginners wrapped into one week.
- Day 1: Frozen fries with a burger patty. Learn shake timing.
- Day 2: Salmon with broccoli. Practice different temps in two batches.
- Day 3: Chicken thighs and Brussels sprouts. Try a spice rub.
- Day 4: Reheat pizza and garlic bread. Learn crisp vs. burn control.
- Day 5: Shrimp tacos. Test fast cook times and avoid overcooking.
- Day 6: Baked potatoes. Practice longer timing and skin oiling.
- Day 7: Wing night. Work on flipping and final saucing.
Keep notes for each day. Write time, temp, and any changes. Two lines per meal is enough. You will dial in your model by the end of the week.
Troubleshooting: Quick Fixes at a Glance
- Food is pale: Increase temp by 10–15°F or add 2–3 minutes.
- Food is dry: Lower temp by 10–20°F and remove 1–2 minutes sooner.
- Uneven browning: Flip halfway; do not overload the basket.
- Smoke: Too much oil or fat drippings. Use a drip tray; trim fat.
- Liners scorching: Add food weight before turning on the unit.
- Rubber taste: Run a burn-off cycle; wash the basket again.
- Chicken skin not crisp: Pat dry, salt early, and run final minutes at 400°F.
Buying Guide for 2026: Features That Matter
Today’s models keep getting smarter. Pick features that match your habits. Do not pay for frills you will not use.
- Capacity: 4–6 quarts for 1–3 people. 8–12 quarts for families.
- Controls: Simple dials are fine. Digital panels help with presets and accuracy.
- Preheat and shake reminders: Small features, big results.
- Integrated probe: Great for meat accuracy if you roast often.
- Nonstick quality: Look for ceramic-infused baskets that clean well.
- App and smart features: Use only if you will actually rely on them.
I lean toward solid build over extra presets. A strong fan and good coating beat a fancy screen. If you love roasts, a probe is worth it. If you reheat often, fast preheat saves time.
Air Fryer vs. Convection Oven
Both use a fan. Air fryers move air closer to the food and do it faster. They brown small batches better. They also preheat fast.
Convection ovens handle large pans and sheet bakes. They are good for big families. But they use more energy and warm the kitchen more.
If you cook for one to three people, an air fryer is a strong choice. It saves time and power while staying crisp. This is why the air fryer cooking guide for beginners focuses on small-batch wins.
Energy and Cost Savings
Air fryers heat a small space. They reach temp fast. Most meals cook in under 20 minutes. That saves power compared to a full oven.
Use it for reheats too. You get better texture than a microwave. You use less energy than your big oven. It is a clear win on busy nights.
Keep the basket clean. A clean unit runs better and smells fresh. Small habits add up to long-term value.
Nutrition Notes Without the Hype
You can cook with less oil and still enjoy crisp food. That can lower fat intake. But quality and portion still matter.
Pick lean cuts. Add fiber with veggies and whole grains. Season with herbs and citrus. You can build bright flavor without extra salt.
An air fryer does not replace skill. It rewards good prep. That is why an air fryer cooking guide for beginners is worth reading before your first big meal.
Smart Prep and Storage Tips
Pat meat dry before seasoning. Water on the surface steams and blocks browning. Dry food, then oil and season. Small steps make crisp food.
Meal prep in simple sets. Chop veggies for two days at a time. Keep them dry in the fridge. Toss and cook when needed.
Leftovers reheat best at 320–350°F. Avoid very high heat. You want to warm through with a gentle crisp. This protects texture.
Beginner-Friendly Recipes You Can Make Tonight
Garlic Parmesan Fries
Use 1 pound frozen fries. Cook at 380°F for 14 minutes. Shake at 7 minutes. Toss with 1 teaspoon oil, 1 clove minced garlic, and 2 tablespoons grated Parmesan. Finish 2 extra minutes.
Honey Garlic Chicken Thighs
Season 1 pound boneless thighs with salt, pepper, and paprika. Cook at 380°F for 16 minutes, flipping at 8 minutes. Warm 2 tablespoons honey with 1 teaspoon soy and 1 minced garlic. Brush and cook 2 more minutes. Aim for 165°F internal.
Crispy Broccoli
Toss 3 cups florets with 1 teaspoon oil, salt, and pepper. Cook at 375°F for 9 minutes. Add lemon zest and a pinch of chili flakes. Serve hot.
Salmon with Dill
Season two fillets with salt, pepper, and dill. Spritz with oil. Cook at 390°F for 9 minutes. Internal temp 125–135°F. Squeeze lemon before serving.
Breakfast Egg Bites
Whisk 4 eggs with salt, pepper, and cheese. Pour into silicone cups. Add chopped spinach. Cook at 300°F for 10–12 minutes. They should set but stay tender.
Serve Better: Sauces and Finishes
A simple finish lifts flavor. Try lemon juice on fish. Use hot honey on wings. Add a yogurt herb sauce to roasted veggies.
Fresh herbs give life to rich foods. A quick chimichurri pairs well with steak bites. A squeeze of lime makes shrimp pop. Keep sauces light for crunch.
This is a small part of any air fryer cooking guide for beginners that pays off big. A final touch makes the meal feel complete.
How to Adapt Oven Recipes for the Air Fryer
Lower the oven temp by 25°F when using an air fryer. Cut the time by 20–30%. Check early the first time you try.
Use smaller pans or silicone cups. Do not block air with deep, heavy dishes. For breaded foods, press crumbs on firmly, then chill.
If a recipe calls for a sheet pan, split it into batches. Air must move around each piece. This keeps it crisp from edge to center.
Managing Moisture: The Secret to Crunch
Moisture fights browning. Dry food before cooking. Salt meat early to draw some water out. Pat again before seasoning if needed.
For veggies, avoid crowding. Use a little oil. Cook at medium-high heat. Finish hotter for the last few minutes to set the crust.
If food seems damp, let it rest on a rack, not a plate. Steam escapes and the crust holds. This is a favorite trick in my air fryer cooking guide for beginners.
Timing Tweaks for Different Models
Smaller baskets cook hotter and faster. Start with the low end of time. Add a minute if needed.
Oven-style units sometimes need 1–3 extra minutes. They have more space. They also tend to brown the top more. Watch top racks closely.
Fan strength matters. Loud, strong fans often cook faster. Keep notes for your unit. It pays off fast.
Budget, Mid-Range, and Premium: What Changes?
Budget models can be loud and simple. They still cook well with good technique. You will do more flipping and watching.
Mid-range units add presets and better nonstick. They often include a preheat and shake reminder. That helps new users a lot.
Premium models may add probes, dual zones, and larger space. If you cook for a crowd, upgrades can be worth it. If not, a good mid-range unit serves you well.
Hosting with an Air Fryer
Plan batch foods like wings and fries. Keep a warming oven at 200°F. Rotate batches in and out. Toss sauces at the end.
Use racks if your unit supports them. You can double capacity for small items. Keep a timer handy to track each batch.
Choose sauces that cling. Thicker glazes stick well. Add delicate herbs after cooking. This keeps color bright and fresh.
Seasoning Blends That Always Work
All-purpose: 1 tsp salt, 1/2 tsp pepper, 1/2 tsp garlic powder, 1/2 tsp paprika. Good on meat and veggies.
Lemon herb: 1 tsp lemon zest, 1/2 tsp thyme, 1/2 tsp parsley, salt to taste. Perfect for fish and chicken.
Smoky sweet: 1 tsp smoked paprika, 1/2 tsp brown sugar, 1/2 tsp chili powder, salt to taste. Great for wings and potatoes.
These blends are easy to mix and store. They fit the simple style of an air fryer cooking guide for beginners.
Kid-Friendly Ideas
Try chicken tenderloins with light breading. Serve with yogurt ranch. Air fry sweet potato wedges with cinnamon. Add a honey drizzle at the table.
Make mini quesadillas with cheese and beans. Air fry at 350°F for 4–6 minutes. Cut into wedges. Offer salsa on the side.
Mini pizzas on English muffins are fun. Let kids add toppings. Air fry at 360°F for 6–8 minutes. They come out crisp and melty.
Vegetarian Wins
Chickpea patties hold shape in an air fryer. Brush lightly with oil. Cook at 375°F for 10–12 minutes. Serve with tahini sauce.
Cauliflower bites are a staple. Toss with spices. Air fry at 380°F for 12–15 minutes. Finish with buffalo sauce.
Tofu turns crisp when pressed dry. Coat in cornstarch and spices. Air fry at 380°F for 12–16 minutes. Shake halfway for even edges.
Gluten-Free Tips
Use cornstarch or rice flour for a light crust. They brown well at high heat. Add an egg wash for adhesion.
Choose certified gluten-free crumbs. Keep a separate silicone liner to avoid cross-contact. Clean the basket well.
Label your spices if you share a kitchen. Prevent mix-ups. A clear system keeps everyone safe and happy.
Low-Mess Cooking Habits
Trim excess fat from meats. Use a drip tray in oven-style units. Place foil only under the tray, not blocking air.
Use a light oil coat. Heavy oil drips and smokes. Wipe the basket rim after oily cooks. This prevents buildup.
Keep a pack of parchment liners sized for your basket. Use them for sticky foods like teriyaki wings. Place food on the liner before turning on the fryer.
Mastering Frozen Foods
Frozen foods are easiest for day one. They are forgiving and quick. Do not thaw fries or nuggets. Cook from frozen for best texture.
Preheat for 2–4 minutes. Shake halfway. Add 1–3 minutes if your batch is large.
If breading looks pale, finish the last 2 minutes at 400°F. Let the food rest a minute before serving. This keeps the crust crisp.
Air Fryer Baking: Yes, You Can
Use silicone cups or small pans. Reduce temp by 25°F from oven recipes. Check early since air fryers run hot.
Banana muffins bake at 325–330°F in 10–12 minutes. Lava cakes work at 350°F in 8–10 minutes. Brownies in a mini pan need 320–330°F for 12–18 minutes depending on thickness.
Let bakes cool on a rack. The air will keep bottoms from getting soggy. Baking can be part of an air fryer cooking guide for beginners when you want treats fast.
When to Preheat and When to Skip
Preheat for meats, fries, and breaded foods. You get better browning. Skip preheat for delicate bakes or items with sugar glazes. They can brown too fast.
For leftover reheats, preheat 1–2 minutes max. A short head start helps without overcooking. The goal is warm and crisp, not dry.
Remember, each model behaves a bit different. Take notes and adjust. In a week, you will know your preheat sweet spot.
Marinades and Brines
Marinades add flavor and moisture. Pat off the excess before cooking. Too much liquid slows browning. Thick glazes go on in the last 2–3 minutes.
Brine chicken breasts for 20–30 minutes in salted water. Pat dry and air fry. You will get juicy meat with a good crust.
Do not marinate fish for too long. Acid can turn it mushy. Fifteen to thirty minutes is plenty for tender fillets.
From “Crisp Enough” to “Wow, That’s Perfect”
Perfection comes from small changes. Try a final 1–2 minute high-heat blast at 400°F. This sets the crust. Rest meat so juices stay inside.
Add a finishing salt or grated cheese at the table. Keep a squeeze bottle of sauce ready. These touches add restaurant-level polish.
This mindset turns a simple meal into a standout one. It is a core part of my air fryer cooking guide for beginners and beyond.
FAQs Of air fryer cooking guide for beginners
Do I need to preheat an air fryer?
Preheating helps most foods brown better. Do it for 2–5 minutes. Skip for delicate bakes or sugar glazes.
How much oil should I use?
Use 1–2 teaspoons per pound as a baseline. Mist or toss to coat evenly. Add more only if food looks dry.
Can I use parchment or foil?
Use parchment with food weight on top. Do not block air holes. Foil can go under a tray for drips, not covering vents.
What are safe internal temperatures?
Chicken 165°F, ground beef 160°F, pork and fish 145°F. Reheat leftovers to 165°F. Use a thermometer for accuracy.
How do I avoid soggy results?
Do not crowd the basket. Pat food dry and use a little oil. Flip halfway and finish hot for 1–2 minutes.
Final Verdict: Which Should You Buy?
The magnet-and-booklet bundle is the fastest way to cook with confidence. It puts times, temps, and liner tips where you need them.
If you want an air fryer cooking guide for beginners that is simple and visual, this is the one. It saves time, cuts guesswork, and improves results from day one.